WE'VE MOVED. . . come on over to our new website and blog!
Showing posts with label Guest. Show all posts

Guest {Cousin} Krista: Dinosaur Party

>> Monday, March 7, 2011


 Happy Birthday Boy with his crown


As soon as I saw Paper & Cake's dinosaur party, I knew I had to have it for my son's 5th birthday party. I love the colors, and the dinosaurs are perfect!


The Invitation:


Here's the invitation (totally customizable so you don't even have to write in the information...just type it in once and you're set!) I found these envelopes with a set of stationary at - $10 for 100 flat cards and envelopes in assorted colors. I figured I would use the fun envelopes in the future, and I like to have flat cards around to use for other crafts, so I'm sure it will come in handy.


The Decorations:


Customizable banner

I added streamers for a little something extra (about $1 per roll at Party City). Then we added balloons in two shades of green.


Door Sign


The Activities:


As the kids were arriving, I put out paper lunch bags and a bucket each of markers and dinosaur foam stickers. Each child decorated their treat bag with their name and some dinos. I then stuffed these with a sheet of dinosaur stickers, a few dinosaur tattoos, and some fruit snacks. (I added a couple of plastic dinosaurs after we did our fossil activity as well.)

After they decorated their bags, I took photos in our little dinosaur photo booth! We had dinosaurs on sticks, hats, magnifying glasses, and mustaches. I also borrowed a large dinosaur toy from a friend and hung up a sandy colored backdrop.


Then the kids all sat at the table and we made fossils! A good friend of mine who teaches kindergarten gave me the idea and it was a huge hit!!

Materials: crayola model magic clay, a pail of plastic dinosaurs, a pail of rocks, some plastic shells/shell-shaped beads, a square of cardboard for each child, and some watered-down brown tempera paint and a brush.


Each child got a ball of clay that they flattened onto their cardboard. Then they press dinosaurs, shells, rocks, etc into the clay leaving an imprint. once they finish then they painted it with the brown wash to make it stand out a little bit. The kids loved it, and my mother-in-law (a former art teacher) did a great job telling them what fossils are and helping the kids while I made lunch.


The Food:
For lunch, I served dinosaur-shaped chicken nuggets (from costco), apple slices for herbivores, and dinosaur bones (pretzels). I loved using the treat bag toppers as food labels! (I used them on the bags too, but forgot to take a picture, of course!)


The kids loved that their juice boxes had dinosaurs on them!


After lunch, we did a T. Rex excavation using plastic sand molds.  I had originally planned to have the party outside, but rain prevented that. I traced the molds onto a piece of poster board, and  ended up hiding the bones in my living room before the kids got there. I showed them the picture, told them that they were paleontologists looking for dinosaur bones, and they went hunting. They placed the bones on the board once they found them. They loved it!


The Game:


Finally, we played pin-the-horn on the triceratops. You can buy this game, but since my mother-in-law is so talented I asked her if she could paint a triceratops. I was in awe of what she created! I traced the horn onto some white cardstock for the kids' to play. They were so funny. And I'm hanging that triceratops in my son's room now!


The Wrap up:


Finally, it was cupcake time! Looks like they had fun!


There are so many game/activity options for a dinosaur-themed party for almost any age - I liked this one and this one. Have fun partying!


Discover more about Krista, at Krista Lucas Photography

Read more...

Guest {Sister} Melia: Peace, Love & Oreos

>> Tuesday, February 15, 2011

On Sunday (yes, the day before Valentine’s Day), Crystal and I set to work on creating her Valentine’s Day Cards. I had seen Oreo pops on several blogs and thought that looked really cute and easy to do.

Using Paper & Cake's printable Peace Party design, I cut out several of the 2" party rounds (yay! for the circle punch) and made my own treat bag toppers using the full sheet of "peace" patterned paper included in the set. I customized the rounds to say “Peace, Love & Oreos” along with a round for Crystal to write out her "to"s and "from"s.

It all worked out great, except the Oreo pops. They were difficult to dip in the chocolate and not fall off the stick. After about 12 attempts, I gave up and ended up dipping ½ of the Oreo into the chocolate. In the end it was a huge time saver and I think they came out really cute.


Read more...

Guest {Star} Genevieve: Print. Cut. Bedazzle!

>> Monday, February 7, 2011

Happy Day lovelies! How stoked am I to be hijacking Abigail's blog today! (Touchdown Dance!!!)

I'm a HUGE stalker so this is an EPIC honor!!!

Here's to hoping my post inspires you to get crazy crafty with your printables!

Cheers!

Think BEYOND the booth!

If you think photo booth props are JUST for parties, think again superchicks!

Creative gift giving is a MUST in my word! And since my brain is always on "CREATE", I thought I'd fashion some of these sweet little Valentine's Day Printable Photo Props into the PERFECT GIFT!

My SuperSophie was thrilled beyond words when I shared this "special gift" with her!

Who says one must host a "real" party to enjoy these fun "toys"! I knew she'd enjoy what I had planed, but I never expected this "gift" would keep her entertained for HOURS!


I took my Valentine's photo props to a whole new level by glittering and beddazling them! What can I say?! I'm a superchick! Go big or go home!  ;-)

My original plan was to play "silly tea party" by introducing Sophie's bears to their new "dress up accessories"! But my rockstar had a different plan! The second she spotted the lips and stashes she squealed with delight and grabbed her digital camera!

She spent HOURS playing "photographer"!

SMILE BEAR!


(You say STASH but Sophie says BANGS! LMAO)

Trust me when I tell you that this PDF download was da bomb! Best $$$ you'll ever spend!

PRINT. CUT. PLAY. as often as you want!


Be crafty, be creative and think BEYOND the timeless photo booth!

Oh oh... and I almost forgot!!! That same afternoon, we also used our "props" to bling out our cupcakes!!! (His for Bear and Hers for Dollie!)


What a perfect ending to a charming teddy bear playdate! 
 
Abigail!!! You're such an inspiration and you're work is beyond stellar! Thanks again for inviting me to play with your FANTABULOUS printable photo booth props!!!

Kiss Kiss to you and your awesome readers! 

Genevieve (AKA Superchick!)


Discover more about Genevieve at Celebrate Today the Superchick Way
TwitterFacebookEtsy

Read more...

Guest {Star} Courtney: DIY Garland Wreath

>> Tuesday, November 23, 2010


These DIY wreaths are perfect for a party because they're fairly inexpensive, and it's easy to find garlands in fun colors like pink and teal! Get creative with different ornaments and ribbons. Hang three wreaths above a party table or make small wreaths for your neighbors. They take 5 minutes to make and can last for years!


What you'll need:
  • Styrofoam wreath
  • hot glue gun
  • garland
  • ribbon or ornament


What to do:
1. Glue one end of the garland to the inside of the Sytrofoam wreath.


2. Wrap the wreath with the garland all the way around until it is completely covered.


3. Using glue, secure the end of the garland.


4. Adorn the wreath with a favorite ornament or large ribbon.


5. Hang with extra ribbon!


Discover more about Courtney Dial at Pizzazzerie.

Read more...

Guest {Cousin} Krista: Birthday in the Park

>> Tuesday, November 16, 2010

For my son's second birthday we decided to hold his party at a local park - there are two play structures (one geared toward smaller kids and one for the bigger ones), lots of grass to run in, and a nice covered area with picnic tables. I also love that a park party is easy to clean up, and can be held rather inexpensively!


Toys we brought: buckets/shovels/trucks to play with in the sand and some soccer balls and frisbees.

Food: pizza, goldfish crackers, chips/salsa, soda, juice and cupcakes


Activities: the park! I also bought some beads on clearance at Michael's (50 cents for a package, and I bought 8 packages) and found some ribbon in the dollar section at Target for the kids to make necklaces if they wanted to.

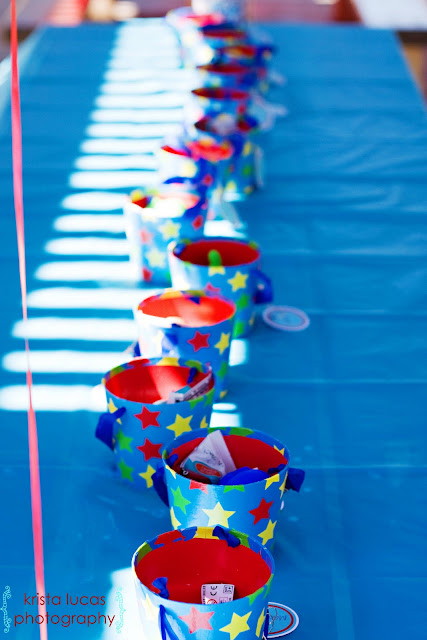
Favors: I found these cute little pails in Target's dollar section on clearance - so they were 50 cents each! I added a little package of fruit snacks, some small bubbles (from Party City), and a squirt toy ($1 for 5 in Target's dollar section). The favors cost me about $1 per child.


Decorations: I do so love Paper & Cake's printable banners and cupcake picks. Add some balloons, colored table cloths and crepe paper and the park looks festive! I also made two cupcake stands since I didn't want to drag my nice glass one to the park - I found some plates and bowls ($2 for 4 of each) and hot glued an upside-down bowl to the plate. Easy and cheap! I also found the little plastic tubs for the kids' drinks in the Target dollar section. I tend to wander through there each time I go to Target, just in case they have something I can use for a future party.


The birthday boy's shirt came from a friend who custom made it.


Discover more about Krista, at Krista Lucas Photography.

Read more...
Related Posts Plugin for WordPress, Blogger...

Search Paper & Cake

Followers