WE'VE MOVED. . . come on over to our new website and blog!
Showing posts with label Recipes. Show all posts

Red, White and Blue Cake

>> Wednesday, May 25, 2011


What with Memorial Day, Fourth of July and Labor Day right around the corner, even my dreams have been in Red, White and Blue!

Let me take just a moment of your time to share a little cake I threw together. All you need: box of cake mix (plus the egg and so forth), cake pan (small medium or large will do), a batch of butter cream (although can of frosting would work just as well), and some Patriotic Nonpareils.

First, bake your cake layers - as directed - and after a bit of cooling time, you will want to slice off the top bump to make flat on the top. I find a long serrated knife works best. For this cake, I used a 6 inch round and I baked up three of them (still only 1 box of mix) I also used a 6 inch cardboard round as a base.


Next, after whipping up your batch of butercream frosting, use a bit to fill between layers, then do a crumb coat. That is, completely cover your cake in a thin layer of frosting to keep all the crumbs in. Refrigerate for 20 minutes.

 Buttercream Frosting
    •    8 oz. unsalted softened butter
    •    4/5 c. powdered sugar
    •    2 T milk
    •    2 t. vanilla extract
    •    2 t. fresh lemon juice
In a stand mixer, fitted with a paddle attachment, add 1/2 the powdered sugar plus all of the other ingredients. Beat until moistened. Add the rest of the powdered sugar. If the frosting is still too thick, you can add a tiny bit of milk at a time until it reaches the desired consistency.


I do find that this next part works best if you are using some kind of rotating cake stand. Coat the sides and top of the cake fairly thickly with your remaining frosting, then, get out your Dritz EZY-hem guide (I know, right?). Hold it parallel to the side of the cake, lightly pressing into it, turning the cake at the same time - drag that hem guide and smooth the frosting out. Cool huh. Wish it was my idea.

And now? the FUN part! I ended up taking the cake outside, because I knew clean up would be super fast using the hose. You could certainly do this inside, but, I'm not coming over to pick up a zillion tiny red white and blue balls off the floor.


Voila! You should totally make this. Add a printable party, or printable photo booth prop set to match and you will be the talk of the block.

Read more...

Mini Desserts

>> Wednesday, April 27, 2011


Mini desserts on a mini dessert buffet, cute right? I was really inspired by a new line of Tasting Party sets from Pier One, LOVE these mini dishes! I was planning on making a regular size strawberry trifle, but individuals were just way cuter. Paired with mini carrot cupcakes and mini peanut butter brownies, this mini dessert mini buffet was just the right size for our family Easter celebration.


Carrot Cupcake recipe is here
Peanut butter brownie recipe is from here
Strawberry Trifle recipe is here


Read more...

A little tip for the Easter Bunny

>> Thursday, April 21, 2011

Dear Easter Bunny,

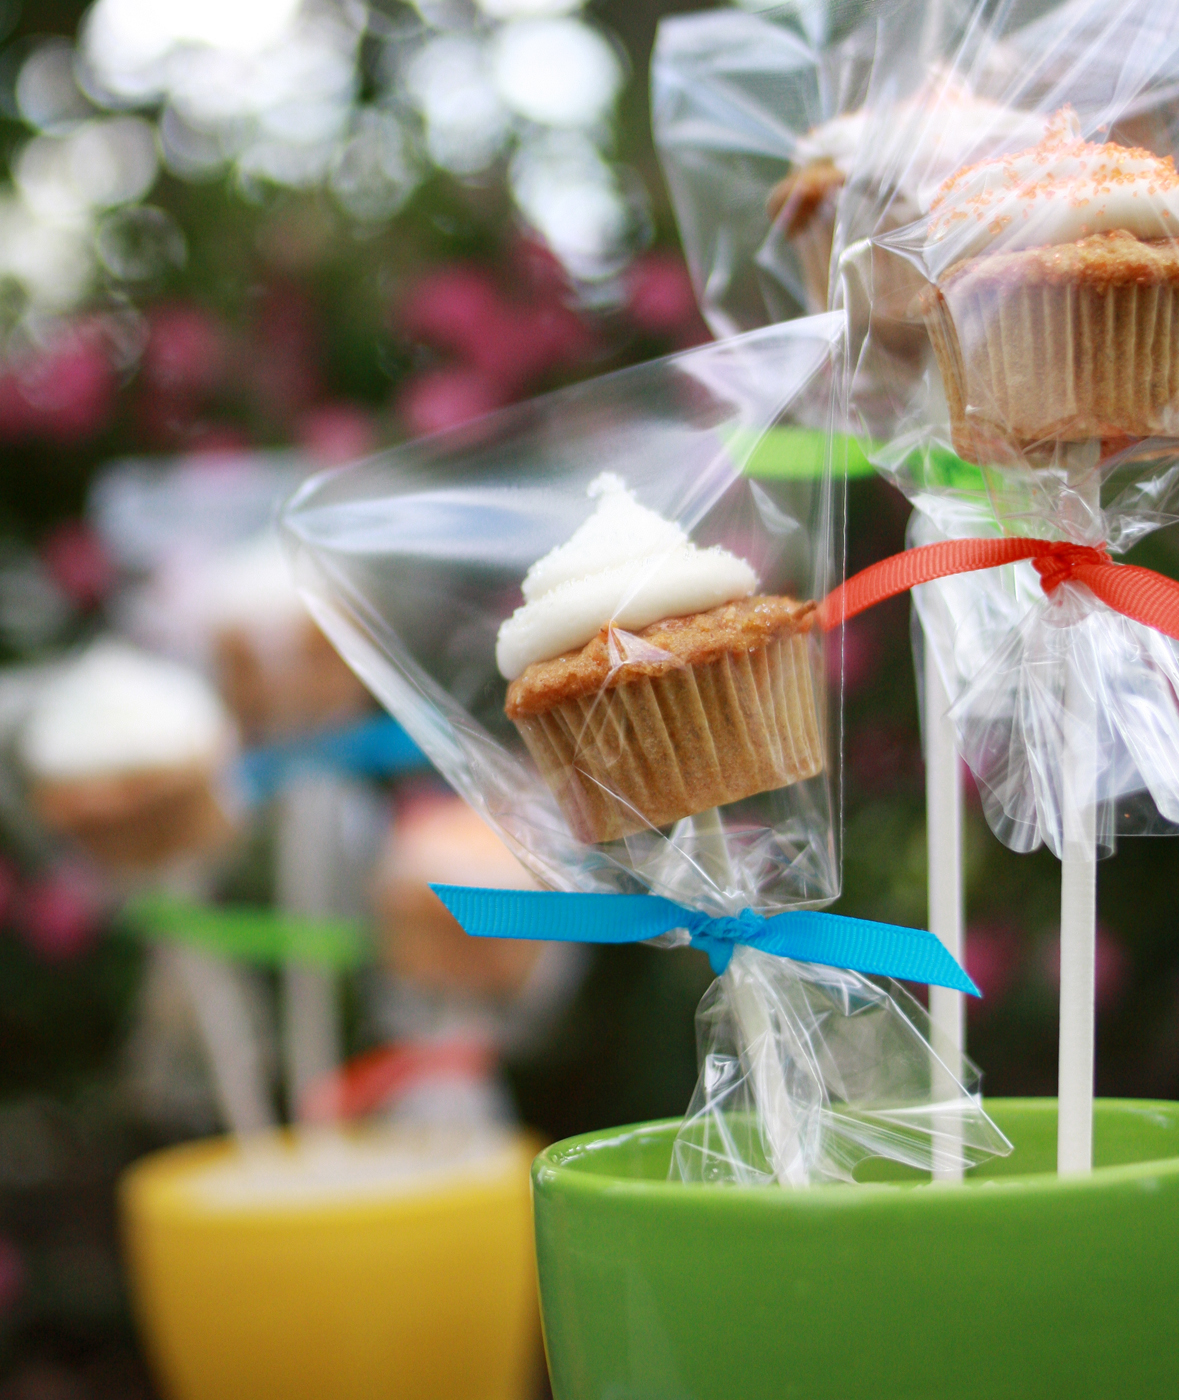
If you would be so kind as to hide some of these yummy carrot mini-cupcakes on a stick instead of the traditional hard boiled eggs, I would be forever in your gratitude.

Sincerely,

mom to Autumn and Jack


But seriously, why not hide these too? Please be sure it's not a super hot day with the cupcakes in the sun for hours, cause yuck! Just bake and frost as usual, refrigerate until the frosting is set. Poke a small hole in the bottom, either with a skewer or knife, and insert a lollipop stick. Small 3 or 4 inch wide cellophane party favor bags work perfectly, tied with a bit of ribbon or string at the bottom.

Stick them directly in the soil, or add them to planter pots filled with rice, beans, styrofoam blocks or oasis florist foam. I used these small green and yellow pots from the dollar bin at Target, but any terracotta or galvanized pot will do.


Carrot Cake Cupcakes
adapted from Sweet Melissa’s Baking Book

2 cups all-purpose flour
1 1/2 teaspoons ground cinnamon
3/4 teaspoon baking soda
1/4 teaspoon baking powder
4 large eggs
3/4 cup vegetable or canola oil
2 cups granulated sugar
1 teaspoon kosher salt
1 pound carrots, grated medium fine

Preheat the oven to 350ºF.
1. in a medium bowl, whisk together the flour, cinnamon, baking soda, and baking powder.
2. In the bowl of an electric mixer fitted with the whip attachment, beat the eggs at high speed until light and frothy, about 1 minute. Decrease the speed to medium and add the oil, sugar, and salt, and mix until just combined. Decrease the speed to low and add the flour mixture, mixing until just combined.
3. Remove the bowl from the mixer. Using a rubber spatula, fold in the carrots.
4. Fill cupcake liners 3/4 full.
5. Bake 15 minutes or until a skewer comes out clean.

Read more...

A Holiday Bake Sale

>> Tuesday, December 21, 2010


Last Thursday night, the kids had their annual Holiday event at school. All the students - Kinder through 8th grade - took turns singing and dancing with their class. Of course there is also an auction and buffet to raise funds for the end of the year. What did I bring? Why pumpkin muffins of course! Easy, and slightly more healthy than lard frosting with sprinkles, I baked my little heart out.

After making about 70 cupcake size muffins, I had this sinking feeling that my "slightly healthier" choice might sit in a box as if sprinkled with the plague. After careful consideration, I decided to add a frosting drizzle and that I would need a little cupcake stand.


Frosting Drizzle: start with powdered sugar, add a little bit of water or milk and mix. add a little vanilla and a pinch of cinnamon. mix until you have drizzly consistency. (I know, its not super precise, but with this one feel free to experiment!)


Cupcake Stand Criteria: A) it would need to fit all 70 muffins without having to refill, B) it would have to cost less than a million dollars, C) it would have to be something that wouldn't really matter if I broke/lost it and D) it had to take less than 45 minutes to shop for.

This is what I came up with: 3 cake boards and 2 plastic ice cream dishes, and a little hot glue = $15.


Read more...

How To: Painted Cookies

>> Tuesday, December 7, 2010

Easy and artistic, "painted cookies" are a big hit in our house (even if the Christmas cookie cutters are still in the attic). For this batch, the kids chose their favorite animal shaped cutters, and even mixed up a batch of black frosting for a realistic touch.


Ingredients
  • 1 1/2 cups butter, softened
  • 2 cups white sugar
  • 4 eggs
  • 1 teaspoon vanilla extract
  • 5 cups all-purpose flour
  • 2 teaspoons baking powder
  • 1 teaspoon salt

Directions
1. In a large bowl, cream together butter and sugar until smooth. Beat in eggs and vanilla. Stir in the flour, baking powder, and salt. Cover, and chill dough for at least one hour (or overnight).
2. Preheat oven to 400 degrees F (200 degrees C). Roll out dough on floured surface 1/4 to 1/2 inch thick. Cut into shapes with any cookie cutter. Place cookies 1 inch apart on ungreased cookie sheets.
3. Bake 6 to 8 minutes in preheated oven. Cool completely.

Chill for 1 to 2 hours
OR
Take the freshly made dough and place a chunck between two sheets of parchment paper. Roll it out to the desired thickness then place the dough and paper on a cookie sheet and pop it into the refrigerator. Continue rolling out your dough between sheets of paper until you have used it all. By the time you are finished, the first batch will be completely chilled and ready to cut. Re-roll leftover dough and repeat the process!


Paint
Mix up some milk, powdered sugar, and a bit of food coloring to the consistency of paint. Use a new or very clean paint brush to paint on the frosting. Add sprinkles if necessary.


Read more...

When a Neighbor hands you Lemons...

>> Sunday, May 16, 2010


 ...Make lemonade!

Richard's (Mr. Abigail-of-Paper-&-Cake) Lemonade:
  • 2 cups pure lemon juice
  • 2 cups sugar
  • 6 cups water
  • ice
Pour 2 cups of water and all the sugar into a saucepan cook over medium heat. Stirring occasionally, heat until sugar is completely dissolved and liquid is slightly thicker. Wash, cut, and squeeze your lemons. Use a strainer to eliminate the pulp and seeds. Pour lemon juice, 4 cups of water and water/sugar syrup into large pitcher, add ice.


Read more...
Related Posts Plugin for WordPress, Blogger...

Search Paper & Cake

Followers